Halaman

Tampilkan postingan dengan label Before and after. Tampilkan semua postingan

Office before and after

A few months ago (in the month of February of this year exactly), a client contacted our company with the question if we would be interested in the redo of their business offices. Although our company is well-known for the more classical interior design, I also love contemporary design. And definitely for business offices!

After discussing with the client about all their needs, my husband and I started to think about the lay-out of the office rooms, the required materials, furniture, lighting,..and finally made a proposal! Our client was enchanted and gave us green light to go on with this project.

The redo had to be finished at the end of July!

I will first show you some “before” pictures of the office rooms. Actually there were 3 existing office rooms of which our client wanted us to create only 2 spaces now.


Lay outNew lay-out of the office.


Sorry for the quality of the pictures! I am not a professional photographer!


     BEFORE PICTURES

  Office 1

41

25

28

30


Office 2

26

33

32


Office 3

36

 38


Powder room

1

BROUGHT IN MATERIALS, FURNITURE AND LIGHTING

42 Wenge wood for the office cabinets and desks.

43Epoxy flooring (for more information click here).

52Contemporary electric fire.

11Wenge colored wooden blinds  

45

Desk lighting armature.

46Ceiling light.

44Floor lamp.

 53Desk chair.

48Ghost chair. 

49Phantom chair.

We have chosen for the white phantom chairs but they couldn’t be delivered on time. I hope they will arrive next week! We will place them at the office desks.

47Sitting aera chair.

54This is the table (not arrived yet) chosen with a white top for the sitting area.

50Door handle.

51Basin sink for the powder room.


AFTER PICTURES 

This is the almost finished project.

Of the earlier office 1 and 2 we created only one office room. I mention it here as Office 1.

Office 1 

15

In front of the former metal structure we placed a white painted wall with a large window.

16 View through this large window.

4

Wenge cabinets and desk, made to measure at the working places of our company.

20

Sitting area with the electric fire.

12 Notice the industrial look of the epoxy flooring.

3  Wenge wall tablet under the large window.


23 The led lighting creates a wonderful effect.

21

Flowers…the final touch!


5

At the backside of the wall where is placed the electric fire, we created a kitchen area,…

13… and used the wenge wood for the tablets.


Office 2

8

A repeat of the wenge furniture.

22

Final touch by my husband.

9 Again the wooden blinds as window treatment.


Powder room

6

Hopefully within a few weeks I will be able to show you some professional taken pictures of this project!!

I hope you enjoyed this office redo.

xx

Signature

LEFEVRE INTERIORS

Reynaertstraat 6A

8710  Wielsbeke

Belgium

Tel. +32 55 42 82 07

Read More

A project I was working on

I am so sorry that I had not much time to blog the passed days! I was so busy with a few projects. So I really didn’ t found time to read all of your blogposts or to make any comments on them my friends!  But I hope you understand that work goes first!

Today I show you some pictures of a project I was working on. The interior is not finished yet. There are some details which will need some further attention. But I couldn’t wait to show you some pictures of it.

My camera is far from a professional one, so excuse me for the lousy images. I wish I could have the assistence of our friend Blayne Beacham of This Photographer’s Life blog!

This is a new built house and my company Lefèvre Interiors was asked to take care for the woodwork and cabinets in some rooms of this house.

Here I show you a part of the project we worked on and hopefully within a few weeks I will be able to post pictures of all the rooms, taken by a professional photographer.


11

View at the library.

19

Before.

14

Library in progress.

15

The library cabinets are made of light stained oak.

2

As you can see, there are no books yet… and we will have to pay attention to choose the right library sconces.

1

I love the combination of the curtains at the bowed window and the shutters on the other window.


10

The family room is situated next to the library.

In contrast with the library, this room is painted. 

Furniture wasn’t all placed yet so I wouldn’t take pictures of the entire room at this moment.

3


18 Before.


4

Caned panels to hide the radiator.


In front of the family room is the TV room.

6

This lovely room is wall papered with a Ralp Lauren wall paper.

5

Even here the radiator is hidden.


20

TV room before.

24

TV room in progress.


Powder room.

7

Powder room after.

8

Oak wood cabinet and a natural stoned sink.


21

Before.

23 

In progress.


And at least some pictures of the kitchen. 

13

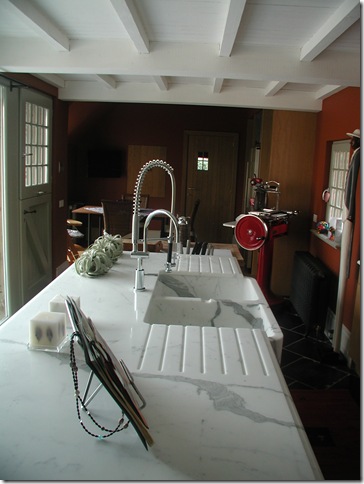
The materials used here are oak for the cabinets, mix of bluestone and parquetry for the floor, marble for the kitchen counter and  Moroccan zellige wall tiles.  Notice the authentic butcher’s block!

9

22

Before.

16

In progress.

12

Our client has chosen the calacatta (not carrara!) marble for the top of the kitchen isle.


I hope you enjoyed this project!

I wish you all a wonderful weekend!

xx

Greet

Read More
DISCLAIMER
If you are the copyright owner of any of these articles or image and don't want me to share them, please, write comments on pages and I will gladly remove them.