Halaman

Dormitorios Modernos amplios con acabados rústicos

Bonito verdad? este dormitorio es muy amplio y tiene buena combinación de colores. El diseño del dormitorio resalta la cabecera y la pared, por el acabado rústico, y a la vez queda muy bonito y presentable. Este modelo de dormitorio pertenece a Esmueble.

Enlace: Esmueble.es

Read More

VINILOS PARA AMBIETES - MODELOS DE VINILOS PARA DECORAR EL HOGAR

Quiero compartir con ustedes este ambiente con aplicaciones de vinilo que resantan la pared. La colección de vinilos con varios diseños son de Actualdecor y se pueden aplicar en varios espacios, como paredes, muebles, etc. Dependiendo de la combinación de colores y los modelos para cada ambiente. Es importante tu imaginación y encontrarás a través de esta nueva forma de decoración un mundo en el que podrás transmitir lo que tu quieras dando expresión a cualquier parte de tu casa.

Imagenes de vinilos: Actualdecor.com
Read More

Three Days of the Condor

It was freezing and windy in New York today and unfortunately I think they already turned the heat off in my building even though it's not quite spring. So all I want to do is curl up on my sofa with blanket and watch a movie, preferably one without subtitles. Makes me wish I owned a copy of Three Days of the Condor. It was one of my favorite movies growing up and I still love it. Robert Redford looked so ruggedly handsome and even though it premiered in 1975, his clothes don't look that dated. In fact, he looks a heck of a lot better than a lot of men I see on the street today!


Read More

Dormitorios Infantiles colores rojos con blanco

Que les parece este dormitorios en combinaciones de color rojo y blanco. El diseño italiano del dormitorio pertenece a Arredamenti Diotti.
El dormitorios es bien iluminado y sobre todo el color blanco resalta más el ambiente.
Espero que les guste el modelo.

Read More

DORMITORIOS INFANTILES EN COLORES Y TONOS VERDE - MODELO DE DORMITORIOS PARA NINOS

Dormitorios Infantiles en colores y tonos verde
Imagenes: Decorandomejor.blogspot.com.
Enlace: arredamentidiotti.it


El dormitorio infantil es un poco difícil al momento de decorar. Desde que elegimos el color, la cama, los muebles, accesorios, etc. Este dormitorio está diseñado en tonos de colores verdes y ademas de ello el ambiente en muy amplio para cuando el niño deseas tener mas espacio al momento de jugar o hacer otras actividades. Es un dormitorio que aprovecha los espacios para cada cosa y las combinaciones estan muy bonitas empezando desde el color del ambiente hasta los muebles y accesorios que llevan dentro
Read More

Dream Design Team

I was chatting with Stefan Hurray who writes the blog Architect Design last week and I mentioned to him that I finally met Miles Redd. Stefan, it turns out, is a big Miles Redd fan and he said that if he ever wins the lottery, he is hiring Miles to decorate his house. But then he said he might want Charlotte Moss to do one room. That was until I suggested that they each do a house. If it's a fantasy, you might as well dream big! Stefan was excited by the thought of Miles (example above) decorating his city home and Charlotte decorating his country house!

I'm not sure if Stefan had this in mind but I thought it was a very pretty example of Charlotte Moss's country house style. Since Stefan is an architect, the designers probably wouldn't be given free reign, since he admits that he is a very opinionated architect! (Aren't they all!)

The conversation got me thinking about who I would choose. I admire the work of so many designers, it would be hard to choose one but if I had them design different homes like Stefan, I wouldn't have to! The one interior designer I kept coming back to as I was thinking was Nate Berkus. I love that his designs fit the client and the space and always look personal and not "done." He also seems like he would be fun to work with since he has a great personality. That and the fact that he's friends with Oprah! Just kidding! I really think he would get my style and I especially love the apartment he helped to decorate for his boyfriend and designer, Brian Atwood, in Milan that was just featured in the April 2009 issue of Elle Decor (above).

Another favorite designer is Steven Gambrel. I loved every room in his West Village townhouse in the January/February 2009 issue of Elle Decor and he would be my choice to decorate my country house. I'm not usually a big fan of color and pattern in my city apartment so I might let him go crazy in the country house. Ok, maybe not totally crazy but a little crazy. I trust him.

After my post about India Hicks and her properties in the Bahamas, she's the only person I would want to help me with my beach house! I think the photos speak for themselves!

Since this is my fantasy, I would of course have a flat in London and I can't think of anyone else I would want to decorate it besides Veere Grenney. I loved everything about his home when I saw it in Australian Vogue Living and would move right in if I could. He incorporates art well in his interiors and that is very important to me.

Perhaps, I'd also open a private little club in London like Annabel's. If I did, it would mostly be because I would want David Collins to design a bar for me. His are hands down the best I've ever seen.

Last but not least, I'd want a little pied-à-terre in Paris. I was thinking that I might like Jacques Grange to decorate it but really only if he could find me a place in his building with the view of the trees above. That's the best part. I had considered Peter Marino since I love the Paris apartment of Giancarlo Giammetti that he designed but I'm not sure I could deal with the biker look he is always sporting.

After the homes, that leaves the yacht and private jet. I'll have to think about who would decorate those. If you're going to dream, you might as well dream big! That's what makes it so fun! So who would be on your dream design team? What houses would the decorate?
Read More

New York Design Center Sample Sale

The New York Design Center Spring 2009 Sample Sale (click on image to enlarge) begins Friday, April 3rd. Included in the sale will be the 20 Baker Tulip Chairs that Michael Tavano used at his DIFFA Dining by Design table. The best thing about this sample sale is that you won't get home and realize you bought a shirt that you will never wear just because it was on sale. Although, you may want to bring your room measurements with you just in case. Happy Shopping!
Read More

Winner!!

Kym and I are so thrilled by the response to the Grains Sack Pillow giveaway!! We had over 200 entries!!! Congratulations to Lisa of Lexington, KY! Lisa, please send on your email and we can coordinate the shipment of your pillow.

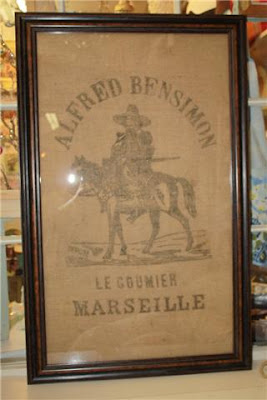
Another big thank you to Kym Fraser of Three Fine Grains for donating the pillow. Above is the newest item in Kym's ever growing collection. These are framed grain sacks! Just lovely!!

Also Kym was so touched by the huge response that she is offering any one who commented and additional 10% off any pillow until April 9th. Just let her know your name and comment when you place your order.

Finally, come back tomorrow evening to read all about my trip to New Orleans!! I am exhausted, but excited to share some of my finds on my wonderful adventure!!
Read More

Art Smart: April Ugallery Picks

I know I had a painting of cherry blossoms in last last month's Ugallery post but I couldn't resist posting another once since it's actually cherry blossom season in Washington, DC. That and the fact that the painting is ridiculously beautiful! In case there is someone who doesn't know about Ugallery, they sell affordable art by young student artists. You can also now email the artists with questions or commission requests through their portfolios on the Ugallery website. This month, I tried to choose art that reminded me of spring. Enjoy!

Deeply Rooted, 2007, monotype bleed print on paper, Charlesy Charton, East Tennessee State University, $250

Untitled 2, 2009, oil on canvas, Matthew King, Massachusetts of Art, $1000

Rainy Sunset, 2007, photograph, Mark Elverson, Massachusetts College of Art, $80

Goodby's Creek #1, 2008, acrylic on canvas, David Nackashi, University of North Florida, $550

Stairway to the Skies, 2007, photograph, Christine Vineyard, Georgia State University, $100

Horizontal Forest, 2008, oil on masonite, Katherine Widen, The Cleveland Institute of Art, $200

Our Farm House, 2009, oil on canvas, Lana Williams, University of Oklahoma, $500

Jerry, 2008, photograph, Michael George, New York University, $85

Unlikely Constellation, 2006, mixed media (collage) on canvas, Diana Delgado, The University of the Arts, $4200

Top Artwork: Enchanted Cherry Blossoms, 2009, acrylic on canvas, Colette Wirz, School of the Art Institute of Chicago, $1000
Read More

Operación : un hogar más agradable

TUTO : CAMBIO DE IMAGEN A UNA PEQUEÑA CAJA DE FRESAS

Con la primavera nos llega esa deliciosa fruta roja y carnosa , la fresa.
A veces si compramos unos dos kilos ,podemos hacernos con la caja que las transporta. Ese será el tuto de hoy, cambiar de aspecto , reciclar, aprovechar esa cajita de madera .


Materiales :

Gesso ( pasta blanca de venta en papelerías y tiendas de manualidadades y bellas artes )
Servilletas de papel que nos gusten
Cola blanca de carpintero
Agua
Pincel
Brocha
Fieltro de un color que pegue con los tonos de la servilleta
Cintas
Picunela


En mi caso utilizaré un precioso modelo que reproduce un alfabeto en punto de cruz , en color rojo.
Éste es de la tienda francesa Comptoir de famille de Perpignan. Me parecieron muy originales y pensé que seguro que ya encontraría algo , con el tiempo, para utilizarlas. Ya les ha llegado el turno.


Aplicamos una capa de gesso con una brocha sin diluir por todas sus caras , exteriores e interiores , y dejamos secar.
Repetimos la operación hasta conseguir que no se vea nada impreso sobre la caja.


Seleccionamos la mitad del papel de servilleta , a lo largo , que queremos utilizar . Quitamos la primera capa de papel blanco que hay detrás. Mi servilleta tiene tres capas ( dos blancas y la del dibujo ) . En este trabajo no quito las dos capas de papel blanco que hay detrás , con el fin de que no quede demasiado endeble .
Vamos a hacer primero las dos caras exteriores más largas .
Con un pincel aplicamos cola blanca a la caja y luego con cuidado , centramos el dibujo. Damos pequeños toques con la mano para dejarla situada.


Pasamos un pincel impregnado suficientemente en agua, por todo el papel que hemos puesto para que vaya asentando. Veremos enseguida que el papel " traga el agua " y parece que queda más pegado a la madera.¡ Ojo , dar toques solamente !


Ahora tomaremos un cuarto de la servilleta y haremos el mismo proceso en los laterales exteriores más estrechos.
El resto de la servilleta la llevaremos hacia la base sobre la que se apoya la caja y pegaremos.

Cuando queden los cuatro lados cubiertos y la base exterior también , veremos que falta un trozo justo en medio por cubrir. Tomaremos un trozo de servilleta que rasgaremos y colocaremos para evitar que la madera se vea.


Con el pincel mojado apretamos el papel empujándolo hacia el interior de las esquinas del trozo de madera que sobresale.


Hacia el interior , aplicamos cola en la madera y pegamos la parte superior , haciendo el borde. Siempre dando toques , no arrastrando pues podemos llevarnos por delante el papel .


Volvemos cortar otra mitad a lo largo y la pegamos desde el borde superior hacia el interior de la caja en el lado más largo. .Alisamos con la mano dando toques y luego volvemos a hacer lo del pincel y el agua que hicimos al principio. Hacemos lo mismo en el otro lado más largo , hacia el interior. Ya tenemos los dos lados interiores más largos forrados.


Con el pincel mojado en agua de nuevo iremos " desgarrando " el papel que queda en el ángulo que hace con la base, así parecerá que el dibujo va todo seguido. Dejamos que todo seque bien.


Cortamos fieltro en forma de triángulo a la medida y lo pegamos con la misma cola blanca.


Elegimos una cinta que recorra todo el perímetro de la caja alrededor de los listones de madera en blanco .


¡ Y YA LA TENEMOS LISTA ! ¡ Menudo cambio , eh !


¿ Y para qué puede servir ?

Para guardar tus tesoros de bordado.......


Para almacenar tus telas........


O para recoger " tus tesoros " de colección......


Espero que te haya gustado este tuto. Yo tardé unas tres tardes en ratos que fui sacando. Así dejé que todo secara bien.
Si te animas , déjanos un comentario que veamos tus resultados y cómo la has aprovechado.
Gracias una vez más por tu visita.
Read More
DISCLAIMER
If you are the copyright owner of any of these articles or image and don't want me to share them, please, write comments on pages and I will gladly remove them.